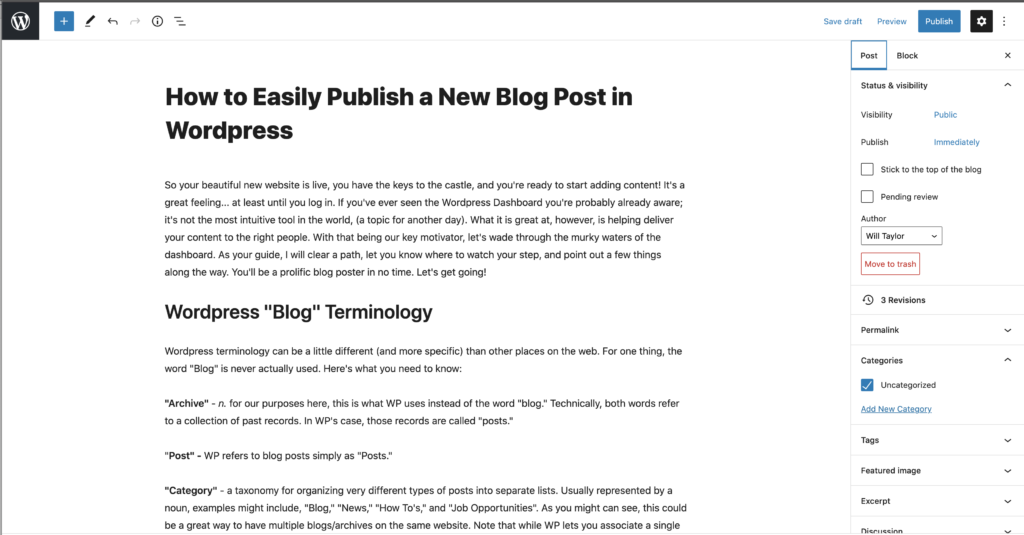
So your beautiful new website is live, you have the keys to the castle, and you’re ready to start adding content! It’s a great feeling… at least until you log in. If you’ve ever seen the WordPress Dashboard you’re probably already aware; it’s not the most intuitive tool in the world, (a topic for another day). What it is great at, however, is helping deliver your content to the right people. With that being our key motivator, let’s wade through the murky waters of the dashboard. As your guide, I will clear a path, let you know where to watch your step, and point out a few things along the way. You’ll be a prolific blog poster in no time. Let’s get going!
WordPress “Blog” Terminology
WordPress terminology can be a little different (and more specific) than other places on the web. For one thing, the word “Blog” is never actually used. Here’s what you need to know:
“Archive” – n. for our purposes here, this is what WP uses instead of the word “blog.” Technically, both words refer to a collection of past records. In WP’s case, those records are called “posts.”
“Post” – WP refers to blog posts simply as “Posts.”
“Category” – a taxonomy for organizing very different types of posts into separate lists. Usually represented by a noun, examples might include, “Blog,” “News,” “How To’s,” and “Job Opportunities”. As you might can see, this could be a great way to have multiple blogs/archives on the same website. Note that while WP lets you associate a single post with multiple categories, it’s generally best to use as few as possible on a given post. If you find a particular category is frequently overlapping with several others, consider making it a tag instead.
“Tag” – similar to how a hashtag is used, a tag is used to help users find multiple posts that mention the same or similar things or themes. Usually represented as adjectives, they offer a second layer of specificity. However, tags aren’t loyal to any one category, though you will likely find they correlate strongly (sometimes exclusively) to a particular category. Used correctly, each post should have only a handful of tags. Some examples of tags for an archive about dog training might include specifics like “golden retriever,” “product review,” and “crate training”
Step 1: Log in
In case you haven’t yet, go ahead and enter your website’s url into the nav bar and add “/wp-admin” to the end. It should look something like this:
https://example.com/wp-admin
Enter your login info as received via email.
Step 2: View & Manage All Posts

In the top left corner of your dashboard, in the left side-menu, hover on the “Posts” tab. A second menu will appear. Click “All Posts.”

Step 3: New Post
Click the “Add New” button to the right of the word “Posts” in large font up top. Start writing. Images can be copied and pasted easily into the content area. I recommend periodically clicking “Save Draft” button/link in the top right to be safe.

Step 3: Tags, Categories, & Settings
In the right sidemenu, select “Post” at the top (under the blue “Publish” button). This is where you can configure your tags and categories for the post, change the author you are posting as, schedule when the post should be published, control the “excerpt” (attention grabbing snippet of text people see before clicking on the full article), and even set a “Featured Image,” (the image that represents the post in links and lists, as well as the large image at the top of the blog post).
Other than that… change NOTHING else, unless you’re sure you know what you’re doing.
Step 4: Publish
Click “Publish”!
Important!!!
If you change the category or title of a post you have already published, it WILL change that post’s URL. Consequently, changing the text of a category (such as spelling) will change the links of every post in that category. This means if you’ve tweeted a link to a blog post, the link will be broken for anyone who clicks on it. Instead, it will lead to a 404 error page, which is very bad for SEO. If you absolutely have to make a change, you can always use a 301 redirect (advanced method) to forward the old link to the new.

